DIY Install
DIY Install is one of the most appealing features for modern bidet seat buyers, especially those who are budget-conscious, handy, or simply eager to avoid the hassle and cost of hiring a plumber. Most bidet seats today—particularly electric models—are designed with user-friendly installation in mind, allowing homeowners or renters to set up the unit themselves in less than 30 minutes. With straightforward instructions, basic tools (usually just a screwdriver and wrench), and universal fittings that work with standard toilets, installing a bidet seat is a manageable weekend project—even if you're not particularly “handy.” This makes it a perfect fit for anyone looking to upgrade their bathroom with added hygiene, comfort, and convenience.
No plumber required—install it yourself with minimal tools
Most installations take less than 30 minutes
Designed to fit standard two-piece toilets
Step-by-step guides and online videos available
Saves money while providing a professional-level upgrade
Key Benefits
Cost Savings
One of the biggest advantages is skipping the service fees of a professional plumber.
- No installation labor costs
- Avoids hidden service or scheduling fees
- Great for renters and homeowners on a budget
Easy Setup with Basic Tools
Most installations require only a screwdriver and adjustable wrench.
- Universal fittings for most toilets
- No complicated electrical or plumbing work needed
- Works seamlessly with popular models like a Smart Remote Control-equipped seat
Instant Bathroom Upgrade
A simple DIY Install transforms your toilet into a spa-like experience in under an hour.
- Adds comfort and hygiene quickly
- No need to renovate your bathroom
- Compatible with most standard U.S. toilet setups
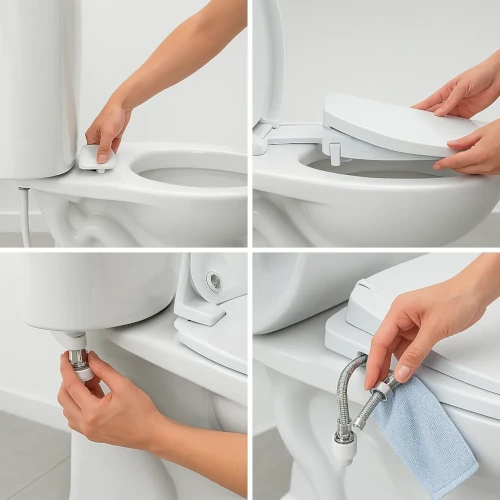
How It Works
1
Note: DIY Install varies across models. The following is a general overview of the most common DIY steps. Refer to your product manual for step-by-step instructions.
2
Turn Off the Water Supply
Shut off the valve behind the toilet and flush to empty the tank.
3
Remove Your Existing Toilet Seat
Unscrew the bolts and remove your current seat.
4
Install the Mounting Plate
Attach the mounting plate included with your bidet seat to the toilet using the original bolt holes.
5
Slide the Bidet Seat Onto the Plate
Once the mounting plate is secure, the bidet seat clicks or slides into place.
6
Connect the T-Valve and Hose
The T-valve goes between your toilet tank and water supply, directing water to both the tank and the bidet.
7
Plug in the Seat
If it’s an Electric Bidet Seat, simply plug it into a nearby GFCI outlet.
8
Test and Adjust
Turn the water back on, power up the seat, and check for leaks. You’re done!
Who Needs This Feature
First-Time Buyers
Great for those new to bidets who want a simple, risk-free upgrade.
Renters
Easy to install and uninstall without making permanent changes.
DIY Enthusiasts
Perfect for anyone who enjoys home improvement projects.
Budget-Conscious Shoppers
A smart alternative to expensive bathroom renovations or high-end plumbing services.
Eco-Conscious Users
Pairs well with features like Power Saving Mode, reducing both energy and water use without a costly installation process.
Common Misconceptions
"I need special tools or plumbing experience."
Not true. If you can tighten a bolt or connect a hose, you can install most bidet seats.
"Only basic models are DIY."
Even high-tech seats with advanced features like heated water, dryers, and remotes are DIY-friendly.
"It’ll damage my toilet or void its warranty."
Bidet seats are designed to be non-invasive and easily removable without damaging the toilet.
Frequently Asked Questions
Q: How long does a DIY Install typically take?
A: Most installs take 20–30 minutes for first-timers, possibly less for those experienced with home projects.
Q: Will it fit my toilet?
A: Most bidet seats are designed to fit standard two-piece toilets. Some one-piece toilets with a French curve may require special models.
Q: Is electricity required?
A: Only if you’re installing an Electric Bidet Seat. Manual models require no power, while electric ones plug into a nearby GFCI outlet.
Q: Can I uninstall it easily when moving?
A: Absolutely. Just reverse the installation steps—great for renters or people relocating.
Q: Are there instructions or support if I get stuck?
A: Yes! Most brands provide detailed manuals, video tutorials, and customer support for installation help.